Page Layout
Page layout involves the physical size of the paper, margins, as well as
headers and footers.
Unlike FO, which establishes most of the page layout at the start of the
document, ConTeXt
creates page layout where it is needed.
Default Page Layout
Without any instructions,
ConTeXt will
create one identical page for the entire document.
% this layout produces satisfactory pages
\starttext
...
\stoptext
<!--this document produces satisfactory pages-->
<TeXML>
 <env name="text">
 ...
 </env>
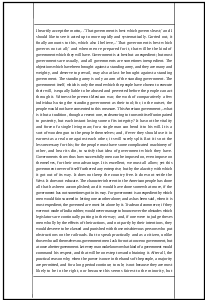
Default layout inserts margins
Physical Page Dimensions
You can set up the size of the paper in two ways, either by using
ConTeXt’s
preset dimensions, or by defining your own.
% Using ConTeXt's pre-set paper sizes
\setuppapersize[A4]
 <!--Using ConTeXt's pre-set paper sizes-->
 <cmd name="setuppapersize">
  <opt>A4</opt>
 </cmd>
% defining your own paper size
% the first option is whatever name you want
\definepapersize[myCustomLayout][width=8.5in, height=11in]
\setuppapersize[myCustomLayout]
<!--defining your own paper size-->
<!--the first option is whatever name you want-->
<cmd name="definepapersize">
 <opt>myCustomLayout</opt>
 <opt>width=8.5in, height=11in</opt>
</cmd>
Width of Body Text
For all page layouts, set up your dimensions with the
definelayout
command. After issuing this command, invoke the definitions you have just
created with the
setuplayout
command. The first option of both the
definelayout and
setuplayout
command is the name of the definition, which can be any name you choose.
(In my example, the first option for both the
definelayout and
setuplayout
commands is “myCustomLayout”.)
Always set your width to
middle.
If you do not plan on using margin notes, use the
backspace and
cutspace property to set
your margins. The backspace
will be the total distance from the left edge of the page to your body
text, while the cutspace
property will the total distance from the right edge of the page to your
body text. For mirrored texts, this will be reversed: the backspace will
determine the right side, and the cutspace the left side.
\definelayout[myCustomLayout][
backspace=40mm,
cutspace=38mm,
width=middle,
]

\setuplayout[myCustomLayout]
<cmd name="definelayout">
 <opt>
   backspace = 40mm,
   cutspace=38mm,
   width=middle
 </opt>
</cmd>

<cmd name="setuplayout">
 <opt>myCustomLayout</opt>
</cmd>
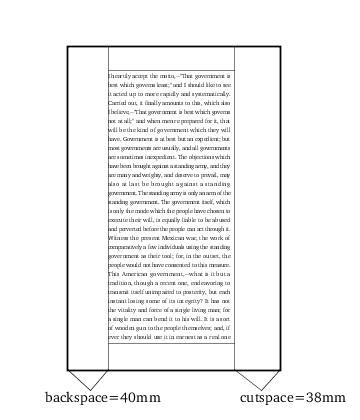
setting up margins with backspace
Customizing Width
If you plan to use margin notes, reserve space in your margins for the
notes, the notes and the edge of the page, and the space between the noes
and your body text. The width of the leftmargin and rightmargin
determines the width your margin notes. The leftmargindistance and
rightmargindistance determine the space between the notes and your body
text.
The backspace property is the sum of the the leftmargin, the
leftmargindistance, and the space from the left edge of the page to the
left margin. If the page is mirrored (see below),this is reversed: the
backspace will be the sum of these regions on the right hand side of the
page.
The cutspace property is the sum of the the rightmargin, the
rightmargindistance, and the space from the right edge of the page to the
right margin. If the page is mirrored (see below),this is reversed: the
cutspace will be the sum of these regions on the left hand side of the
page.
This leaves two regions which have no name (so far as I know), and which
are calculated by
ConTeXt rather
than being explicitly coded by a user. These regions are the very outer
edges of the page.
ConTeXt
calculates these regions by subtracting the margin and margin distance
from the backspace or cutspace value. In our example, the left outer edge
is 15mm because the backspace (50mm) minus the leftmargin (25mm) minus
the leftmargindistance (10mm)= 15mm.
\definelayout[myCustomLayout][
leftmargin=25mm,
rightmargin=30mm,
leftmargindistance=10mm,
rightmargindistance=10mm,
backspace=50mm,
width=middle,
]

\setuplayout[myCustomLayout]
<cmd name="definelayout">
 <opt>
   leftmargin=25mm,
   rightmargin=30mm,
   leftmargindistance=10mm,
   rightmargindistance=10mm,
   backspace=50mm,
   width=middle,
 </opt>
</cmd>

<cmd name="setuplayout">
 <opt>myCustomLayout</opt>
</cmd>
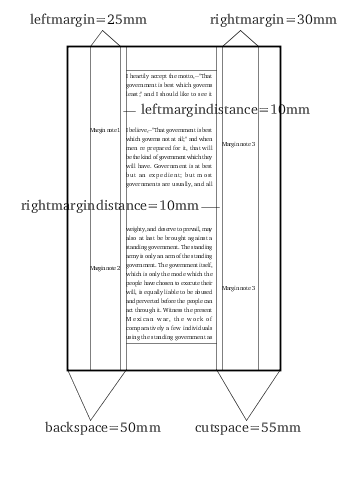
custom margins
Tips
-
If you do not explicitly declare
leftmargindistance or
rightmargindistance,
ConTeXt will
set these regions to 5mm.
-
If you do not explicitly declare a
backspace value,
ConTeXt will
set this region to 25 mm. If your left margin is greater than 25 mm,
this can lead to unwanted results.
Height of Body Text
Setting up the height is very similar to setting up the width. You can
control the space from the edge of the page to headers, the header space
itself, and the distance between the header and the body text.
If you don’t use headers and footers, alter the height of the body
text by changing the header and footer properties, and by setting the
height to fit. Keep in mind that
ConTeXt puts a
default space of 25 mm at the top and bottom of the page.
Always set your height to middle.
\definelayout[myCustomLayout][
 header=30mm,
 footer=25mm,
 height=middle,
]

\setuplayout[myCustomLayout]

...
<cmd name="definelayout">
 <opt>myCustomLayout</opt>
 <opt>header=30mm,
   footer=25mm,
   height=middle,
 </opt>
</cmd>
<cmd name="setuplayout">
 <opt>myCustomLayout</opt>
</cmd>
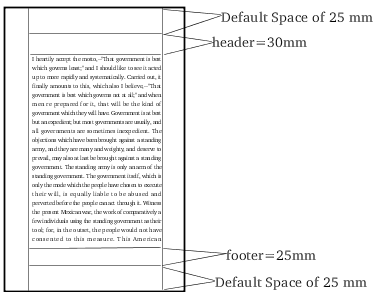
changing body height through headers and footers
Customizing Height
For headers and footers, reserve space for the notes, as well as space
between the notes and the edge of the page as well as space between the
noes and your body text. Increasing any of the space in this region
reduces the height of the body text. Always set your height to middle.
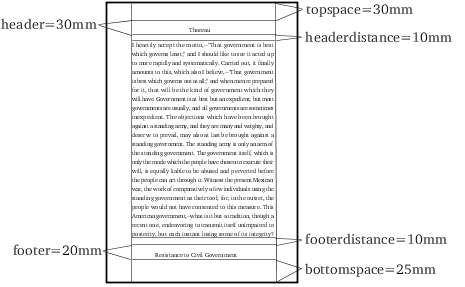
The topspace properties
establishes the space at the very top of the page. The
bottomspace properties
establishes the space at the very bottom of the page. The
headerdistance and
footerdistance reserves
space between the header or footer and the body text.
\definelayout[myCustomLayout][
 header=30mm,
 footer=20mm,
 headerdistance=10mm,
 footerdistance=10mm,
 topspace=30mm,
 bottomspace=25mm,
 height=middle,
]

\setuplayout[myCustomLayout]
<cmd name="definelayout">
 <opt>
   header=30mm,
   footer=20mm
   headerdistance=10mm,
   footerdistance=10mm,
   topspace=30mm,
   bottomspace=25mm,
   height=middle,
 </opt>
</cmd>
<cmd name="setuplayout">
 <opt>myCustomLayout</opt>
</cmd>

...
setting up footer and header space
Tips
Mirroring Pages
ConTeXt allows
for different layouts on the first, even, and odd pages. Unfortunately,
the text width must be the same on all pages within this text flow. If you
change the width from one page to the next, the text will not necessarily
line up. In order to change the width of a page, you need to start a new
run of pages. For example, you can create a book in which chapter 1 had
pages that are 8 inches wide while chapter 2 had pages 8.5 inches wide.
But within the chapter, you couldn’t have the odd page be 8 inches
wide and the even page be 8.5 inches wide.
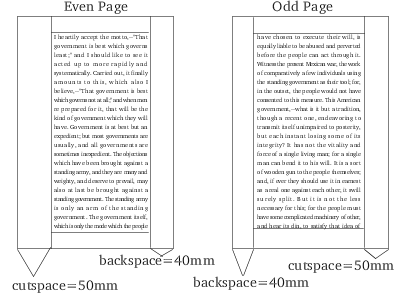
The easiest way to change layout for odd and even pages is by mirroring
them, so that the page layout will be switched for odd and even pages. To
do so, add change the
setuppagenumbering
command to produce double-sided documents.
\setuppagenumbering[state=stop,
  way=bytext, alternative=doublesided]

\definelayout[myCustomLayout][
width=middle,
backspace=40mm,
cutspace=50mm,
]

\setuplayout[myCustomLayout]
<cmd name="setuppagenumbering">
 <opt>state=stop,
  way=bytext,
  alternative=doublesided
 </opt>
</cmd>

<cmd name="definelayout">
 <opt>
  width=middle,
  backspace=40mm,
  cutspace=50mm,
 </opt>
</cmd>

<cmd name="setuplayout">
 <opt>myCustomLayout</opt>
</cmd>
mirroring pages
Tips
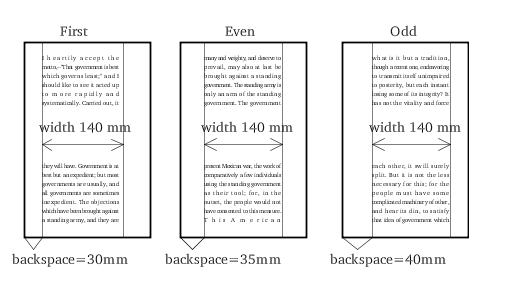
Changing Layouts for First, Odd and Even Pages
A more flexible way to change layouts for different pages is to use a
position argument. Use “1” for the first page, and
“odd” and “even” for the odd and even pages.
Like with mirroring pages, you have to make sure the width of all your
pages is the same.
% setup layout for first page
\definelayout[1][
 backspace=30mm,
 cutspace=40mm,
 width=middle,
]

% setup layout for even page
\definelayout[even][
 backspace=35mm,
 cutspace=35mm,
 width=middle,
]

% setup layout for even page
\definelayout[odd][
 backspace=40mm,
 cutspace=30mm,
 width=middle,
]

% this command now takes no option
\setuplayout
<!--setup layout for first page-->
<cmd name="definelayout">
 <opt>backspace=30mm,
 cutspace=40mm,
 width=middle,
 </opt>
</cmd>

<!--setup layout for even page-->
<cmd name="definelayout">
 <opt>backspace=35mm,
 cutspace=35mm,
 width=middle,
 </opt>
</cmd>

<!--setup layout for odd page-->
<cmd name="definelayout">
 <opt>backspace=30mm,
 cutspace=40mm,
 width=middle,
 </opt>
</cmd>

<!--this command now takes not option-->
<cmd name="setuplayout" gr="0"/>
different first, even and odd pages
Tips
-
You don’t need to define a separate layout for the first page if
you just want different odd and even pages.
-
Customization of pages is not limited to width. You can have different
height and footerdistances, etc, for first, even and odd pages.
-
If you set the header or
footer to 0mm, you will
eliminate the space and any texts for headers or footers along with it.
There are also other ways to control headers and footers explained
below.
Creating Headers and Footers
Simple Headers and Footers
Place headers and footers with the commands
setupheadertexts
and
setupfootertexts.
These commands takes 4 arguments. The first is for the left margin on odd
pages, the second for the right margin on odd pages, the third for the
left margin on even pages, and the fourth for the left margin on even
pages.
\setupheadertexts[one][two] [three][four]
\setupfootertexts[one][two] [three][four]
<cmd name="setupheadertexts">
 <opt>one</opt>
 <opt>two</opt>
 <opt>three</opt>
 <opt>four</opt>
</cmd>
<cmd name="setupfootertexts">
 <opt>one</opt>
 <opt>two</opt>
 <opt>three</opt>
 <opt>four</opt>
</cmd>
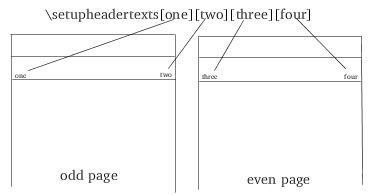
setupheadertexts with four arguments
When pages are mirrored, the third and fourth argument are reversed. The
placement of the headers and footers does not change for even
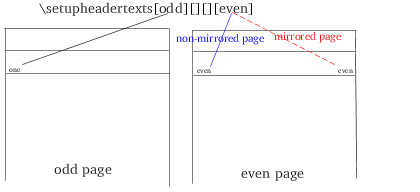
headers switched for mirrored layout
Formatting Text in Headers and Footers
We need special commands to format headers and footers, since the normal
commands for body text won’t work.
The hfill command
helps us align text left and right, as well as center text. This command
tells ConTeXt
to put as much space as possible between it and the next object. If we
use it before some text, it pushes that text all the way to the left. If
we use it after some text, it pushes that text all the way to the right.
If we use the hfill
command both before and after the text, it puts as much space
between the left and the right as possible, resulting in text being
approximately centered. The centering won’t be exact because the
space of your text on the left will most likely not be the same as the
space for the text on the right. To fix this, use the
llap and
rlap commands.
\setupheadertexts[\hfill American Lit][] [][Thoreau
\hfill]

\setupfootertexts[\rlap{Romanticism} \hfill
\pagenumber \hfill \llap{Civil Disobedience}][] [][Civil Disobedience]
<cmd name="setupheadertexts">
 <opt>
  <cmd name="hfill"/>
   American Lit
 </opt>
 <opt/>
 <opt/>
 <opt>
  Thoreau
  <cmd name="hfill"/>
 </opt>
</cmd>

 <cmd name="setupheadertexts">
 <opt>
  <cmd name="rlap">
   <parm>Romanticism</parm>
  </cmd>
  <cmd name="hfill"/>
  <cmd name="pagenumber"/>
  <cmd name="hfill"/>
  <cmd name="llap">
   <parm>Civil Disobedience</parm>
  </cmd>
  </opt>
  <opt/>
  <opt/>
  <opt>
  Civil Disobedience
  </opt>
 </cmd>
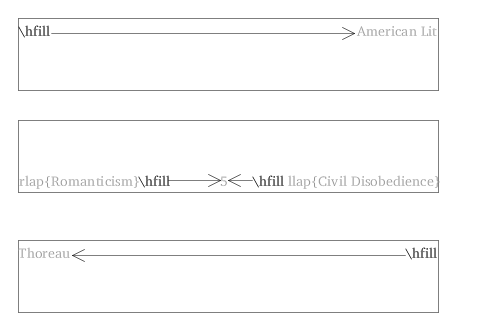
using hfill to place headers and footers
Tips
Since ConTeXt
doesn’t allow us to create paragraphs in headers and footers as we
would in normal text, we use the
vbox command to
create multi-lines headers and footers. The command
vbox stands for
vertical box, the basic paragraph unit that
ConTeXt uses
behind the scenes. In order to break a line inside a
vbox, use
vskip.
\setupheadertexts[\vbox{Chapter 8 \vskip5pt Thoreau}][][][Civil
Disobedience]
<cmd name="setupheadertexts">
 <opt>
  <cmd name="vbox">
   <par>
    Chapter 8
    <cmd name="vskip5pt"/>
    Thoreau
   </par>
  </cmd>
 </opt>
 <opt/>
 <opt/>
 <opt>Civil Disobedience</opt>
</cmd>

using a vbox to create multi-line header
Still Another Example of Customization
I came across a problem in formatting a footer with a thesis. I needed a
1-inch space at the bottom, with a page number centered in the middle,
and 1/2 an inch from the bottom. None of the above commands allowed me
to both center the page number and control its vertical placement, so I
finally had to settle for this work-around.
\setupfootertexts[\vbox{\centerline{\pagenumber }\vskip12pt }]
 [][][]
The vbox command
functions exactly as above. The
centerline
command centers the page number. The
vskip command
put space between the bottom of the footer space and the actual number.
In other words, it raised up the number. A greater number for
vskip would have
made the number even higher.
Changing the layout for different parts in a document
Long documents require different layouts for different parts. The abstract
in a thesis may need a narrower page width. Each chapter in a book might
have a different header.
ConTeXt has a
hierarchy of sections for the user, including part, chapter, section,
sub-section, and even sub-sub-section. If a user structures his document
using these divisions,
ConTeXt can
create a table of contents and keep track of numbering, amongst other
things. However, the XML author doesn’t need these features, which
often prove more of a nuisance. Through the use of XSLT, and XML author
already has access to a powerful numbering scheme and the ability to
create any type of table of contents she wants.
Therefore I’ll use only one section command,
part. The
part command
provides the mechanism to re-define physical page size, page layout, and
headers and footers. By default, the
part command will
force page numbering to begin at one. In order to stop this behavior (and
you probably want to), set the option
way in the
setuppagenumbering
to bytext.
To start a new run of pages in which you redefine layout, issue a
part command.
Once you issue this command, create any new definitions you need to.
Simply follow the same procedure outline previously in this document, and
the new settings take affect. Remember to issue these commands
after you issue the
part command. (The
once exception is
setuphead, which
is explained below.) If you redefine headers and footers before the
part command, the
new definitions might appear in the previous section.
Here is an example of creating new headers for each chapter in a book.
\part{}
\setupheadertexts[Chapter 1][][][American Literature]
% the rest of the chapter goes here

\part{}
\setupheadertexts[Chapter 2][][][American Literature]
% the rest of the chapter goes here
<cmd name="part">
 <parm/>
<cmd/>

<cmd name="setupheadertexts">
 <opt>Chapter 1</opt>
 <opt/>
 <opt/>
 <opt>American Literature</opt>
 <!--the rest of the chpater goes here-->
</cmd>

<cmd name="setupheadertexts">
 <opt>Chapter 2</opt>
 <opt/>
 <opt/>
 <opt>American Literature</opt>
 <!--the rest of the chapter goes here-->
</cmd>
Setting up the first page in a new section
The setuphead
command (not to be confused with the
setupheader
command!), helps us set up the first page for each new part. Because this
command defines the new section, it must come
before the
part command.
The first option of this command is the section it defines, such as part,
section, or sub-section.
Forcing left or right pages
Use the page option in
setuphead to
force an odd or even page.
left forces a left
page, and right forces
a right page.
\setuphead[part][page=left]
<cmd name="setuphead">
 <opt>part</opt>
 <opt>page=left</opt>
</cmd>
Customizing headers and footers for the first page
Controlling the Placement of Headers and Footers
The setupheader
and setupfooter
allows for control over header and footer placement. To completely
eliminate a header or footer for just one page, use the
setupheader or
setupfooter commmand in
conjunction with the
header=empty.
% eliminates the header and space for the header
% for one page
\setupheader[part][header=empty]
<cmd name="setupheader">
 <opt>part</opt>
 <opt>header=empty</opt>
</cmd>
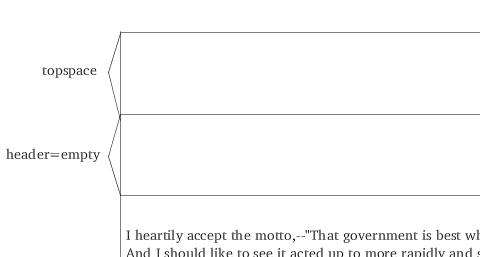
header=empty
Setting header=high, not
only eliminates the header text, but the white space around it.
% eliminates the header and space for the header
% for one page
\setupheader[part][header=high]
<cmd name="setupheader">
 <opt>part</opt>
 <opt>header=empty</opt>
</cmd>
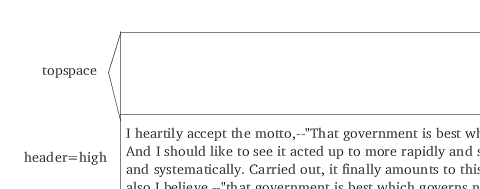
header=high
Tips
-
Setting the header to
none eliminates
headers and footers, as well as the space they occupy, for all pages
until a contradictory command is issued.
-
Other values for header
are “stop”, which stops the placement of headers and
footers; “start”, which starts them again if they have
been stopped.
-
The footer=empty and
footer=high commands
are the equivalent to their header counterparts. The text and or
space at the bottom will be suppressed.
Different headers and footers for first page
The setupheader
command only lets us eliminate a header or footer for the first page,
not create a new one. To create a custom header of footer for the first
page, define text with the
definetext
command, and then recall this defintion in the
setuphead
command.
\definetext[customHeader][header][Chapter 1]
\setuphead[part][header=customHeader]
\part{}
<cmd name="definetext">
 <opt>customheader</opt>
 <opt>header</opt>
 <opt>Chapter 1</opt>
</cmd>

<cmd name="setuphead">
 <opt>part</opt>
 <opt>header=cutomHeader</opt>
</cmd>
custom header
This example uses three options for the
definetext
command. The first is the name I give it, which I use again in the
setuphead
command. The second is the position. The last options is the text
placed in the header.
Tips
Page Numbering
The command
pagenumber prints
out a page number wherever it is issued (for example, in a header or
footer).
Resetting the page number
In order to reset the page number, use the
setuppagenumbers
command. Set the option
number to the desired
number.
% sets the current page number to 3
\setuppagenumber[number=3]
Formatting the page number
In order to change the page number to something different than an Arabic
number, use the
setuppagenumbering
command. Set the conversion
option to characters
for lower-case letters,
Characters for
upper-case letters,
romannumerals for
lower-case Roman Numerals, and
Romannumerals for
upper-case Roman Numerals.
% Changes "3" to "iii"
\setuppagenumbering[conversion=romannumerals]
copyright 2005 Paul Henry Tremblay
License: GPL
home | contents | previous | next

last updated: 2005-03-27