Paragraph Formatting
The basic block unit in ConTeXt is the paragraph. Create a paragraph block with the par command.
A one line paragraph\par
Another one line paragraph\par
A one line paragraph<cmd name="par" gr="0"/>
Another one line paragraph<cmd name="par" gr="0"/>
ConTeXt allows you to also create a paragraph with a simple blank line, such as you would in email. TeXML works the opposite: it will get rid of any blank lines. So if you use TeXML, the only way to form a paragraph is with the par command.
Space between, before and after
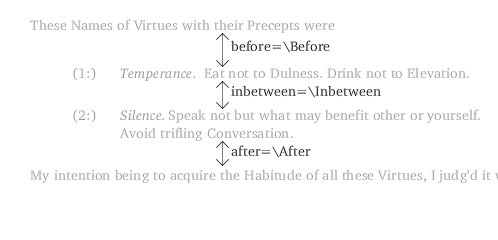
Use the commands setupwhitespace to control the amount of space between paragraph. To reset the amount of space to the default value, use “none” as a value.
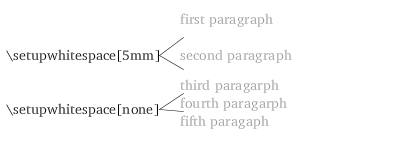
\setupwhitespace[5mm]
first paragraph\par
second paragraph\par
third paragraph\par
\setupwhitespace[none]
fourth paragraph\par
fifth paragraph\par
<cmd name="par" gr="0"/>
<cmd name="setupwhitespace">
 <opt>5mm</opt>
</cmd>
first paragraph
<cmd name="par" gr="0"/>
second paragaph
<cmd name="par" gr="0"/>
third paragaph
<cmd name="par" gr="0"/>
<cmd name="setupwhitespace">
 <opt>none</cmd>
</cmd>
fourth paragarph
<cmd name="par" gr="0"/>
fifth paragarph
<cmd name="par" gr="0"/>
creating space between each paragraph
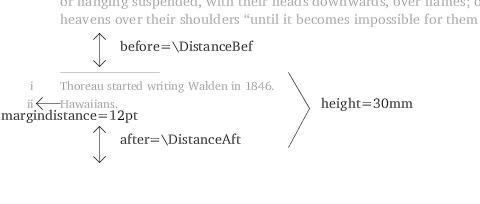
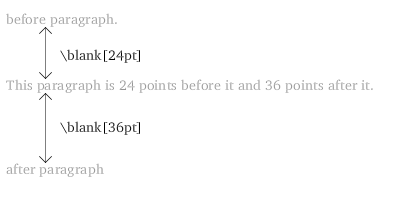
If you want to add extra space before of after a paragraphs, use the blank command.
before paragraph
\blank[24pt]
This paragraph has 24 points before it and 36 points after it.\par
\blank[36pt]
after paragraph\par
<cmd name="blank">
 <opt>24pt</opt>
</cmd>
This paragraph has 24 points before it and 36 points after it.
<cmd name="par" gr="0"/>
<cmd name="blank">
 <opt>36pt</opt>
</cmd>
after paragraph
<cmd name="par" gr="0"/>
space before and after paragraph
The blank command will not put any blank space at the top of th page unless you use the force option.
\blank[force, 36pt]
% chapter title
Thoreau's Life
<cmd name="blank">
 <opt>force, 36pt</opt>
</cmd>
<!--title chapter-->
Thourea's Life
Line spacing
Set up line spacing with the setupinterlinespace command. This command’s option can be set to small for single spacing (the default), medium for 1.5 spacing, or big for double spacing.
% doublespacing
\setupinterlinespace[big]
<!--doublespacing-->
<cmd name="setupinterlinespace">
 <opt>big</opt>
</cmd>
To gain even more control over the space between lines, change the option to line=x, where x is some value, such as 18pt.
\setupinterlinespace[line=18pt]
<cmd name="setupinterlinespace">
 <opt>line=18pt</opt>
</cmd>
Tips
-
Setting the value of line to some value of ex ensures that your line spacing will always stay in proportion to the size of your font.
-
2.8ex is the default size of line.
-
3.5ex seems to be the size for one and one half line spacing (medium).
-
4.2ex seems to be the size for double spacing (big)
Indenting
First line
Two commands control indenting of the first line: indenting and setupindenting.
The first command determines the amount of the indent for the first line.
\setupindenting[12pt]
<cmd name="setupindenting">
 <opt>12pt</opt>
</cmd>
The indenting command, determines when indenting will occurr. By default, ConTeXt will not indent blocks of text that it determines do not look good, such as a block of text after a vertical space. To override this feature and gain complete control over indenting, set indenting to “first”.
\indenting[first]
<cmd name="indenting">
 <opt>first</opt>
</cmd>
This indents all paragraphs by the amount of the setupindenting command. You probably don’t want headings and titles indented, so just before you write your header, use the noindenting command.
\indenting[first]
\setupindenting[12pt]
body text ...\par
% turn off indenting for a section head
\noindenting
section head\par
% body text will again be indented
more body text..\par
<cmd name="indenting">
 <opt>first</opt>
</cmd>
<cmd name="setupindenting">
 <opt>12pt</opt>
</cmd>
body text..
<!--turn off indenting for a section head-->
section head\par
<!--body text will again be indented-->
more body text ...\par
Tips
-
You don’t need to use the indenting command to get indenting to work. If you do not, ConTeXt will use the default of not indenting paragraphs after vertical spaces.
Indenting blocks
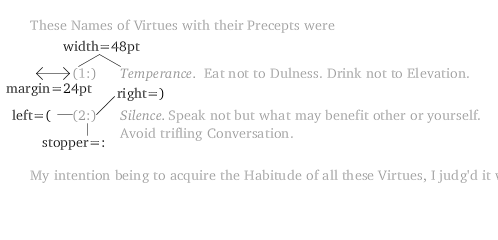
To reduce the width of a text, as for a quote, use the envirnoment “narrower.” Set up the dimensions with the setupnarrower command.
\setupnarrower[left=24pt, right=30pt]
\startnarrower[left, right]
 body text..
\stopnarrower
<cmd name="setupnarrower">
 <opt>left=24pt, right=30pt</opt>
</cmd>
<env name="narrower">
 <opt>left, right</opt>
 quote text
</env>
Tips
-
If you do not use the setupnarrower command, ConTeXt will set right and left to 12pt.
-
If you only want to indent the left, leave off the right for the option in setupnarrower. Likewise, leave off the left if you only want to indent your text to the right.
Aligning text
Non-justified text
By default, ConTeXt justifies text. In fact, creating pretty text is one ConTeXt’s main feature. If you want your text non-justified, use the setupalign command with the option of right.
\setupalign[right]
<cmd name="setupalign">
 <opt>right</otp>
</cmd>
Tips
-
To align text to the left, set the option to left.
-
To center the text, set the option to middle.
-
Justified text is easier to read because the spaces between the words are the same.
-
Kudos for the developers of ConTeXt for making non-justified text so easy to use. In other forms of TeX, using non-justified text required complicated code.
Changing alignment on a block of text
The above code works for setting the alignment for the entire document. To change just a block of text, start a new alignment enviornment. Within this enivronment, the text will take on the justification assigned to it.
\startalignment[middle]
{\bfd ABSTRACT OF THESIS}\par
\blank[.5in]
\stopalignment
Tips
-
As the exmple shows, this structure is good for titles of sections. The examples below don’t allow the fexibilit that of the startalignment environment.
Changing alignment of small portions of text
Most likely, you will use one type of alignment for your document, such as justified or non-justified. However, you will often want to change the alignment for just a portion of text, such as the date at the top of a letter, or a title.
Centering
To center a line, use the midaligned command.
\midaligned{This text is centered}
<cmd name="midaligned">
 <parm>This text is centered</parm>
</cmd>