Tables with TABLE
The TABLE is the most powerful and flexible tables module in ConTeXt. Its sytax is closest to css stylesheets.
You can find a PDF file with many examples at url=http://www.pragma-ade.com/general/manuals/enattab.pdf
The following is a simple table.
\bTABLE
\bTR \bTD State \eTD \bTD3-year average \eTD \bTD2-year average \eTD \eTR
\bTR \bTD Alabama \eTD \bTD 13.3 \eTD \bTD 13.5 \eTD \eTR
...
\eTABLE
Each command in the TABLE environment is paired: bTABLE is matched with eTable, bTR is matched with eTR, and so on. The lower-case “b” stands for beginn, while the lower-case “e” stands for end.
The commands otherwise look very much like XHTML format, with TR standing for table row, and TD for table cell.
Merging cells horizontally
In order to merge cells horiziontally, use the nc option after the cell you want to merge. The nc stands for number of columns.
\bTABLE
\bTR \bTD State \eTD \bTD3-year average \eTD \bTD2-year average \eTD \eTR
%
% merge the first two cells
\bTR \bTD[nc=2] Alabama \eTD  \bTD 13.5 \eTD \eTR
%
% merge last two cells
\bTR \bTD Alaska \eTD \bTD[nc=2] 17.8 \eTD  \eTR
%
%merget all three cells
\bTR \bTD[nc=3] Arizona \eTD  \eTR
\eTABLE
Merging cells vertically
In order to merge cells vertically, use the nr option after the cell you want to merge. The nj stands for number of rows.
\bTABLE
\bTR \bTD State \eTD \bTD3-year average \eTD \bTD2-year average \eTD \eTR
%
% merge first cell down one
\bTR \bTD[nr=2] Alabama \eTD \bTD 13.3 \eTD \bTD 13.5 \eTD \eTR
%
% merge last cell down one
\bTR \bTD 17.8 \eTD \bTD[nr=2] 18.8 \eTD \eTR
\bTR \bTD Arizona \eTD \bTD 17.3 \eTD  \eTR
\eTABLE
Creating multi-page tables
In order to make sure a larget TABLE can split across pages, use the option split=yes right after the bTABLE command.
\bTABLE[split=yes]
If you want create tables in which the header is repeated with each page, divide your table into the head, body, and foot. Use the bTABLEhead and eTABLEhead to create the head. Use the bTABLEbody and eTABLEbody to create the body. Use the bTABLEfoot and eTABLEfoot to create the foot.
Use the option split=repeat right after the bTABLE command.
The head will appear at the top of the table on each page. The foot will appear once at the bottom of the table.
% split the table across pages and make sure the head is foot are repeated
\bTABLE[split=repeat]
% create the head
\bTABLEhead
\bTR \bTD State  \eTD \bTD 3-year average \eTD \bTD 2-year average \eTD \eTR
\eTABLEhead
% create the body
\bTABLEbody
\bTR \bTD Alabama  \eTD \bTD 13.3  \eTD \bTD 13.5  \eTD \eTR
\bTR \bTD Alaska  \eTD \bTD 17.8  \eTD \bTD 18.8  \eTD \eTR
...
\eTABLEbody
% create the foot
\bTABLEfoot
\bTR \bTD[nc=3] Details may not sum to totals because of rounding. \eTD \eTR
\eTABLEfoot
\eTABLE
Customizing TABLE
Customizing cells and rows in TABLE is more straightforward than with other table modules. Use the setupTABLE command. The first few commands of this option describe the rows, columns, or cells that need to be customized. The last option describes the actual customization.
You can use as many setupTABLE commands as you have customizations.
cell numbers
Each cell in the TABLE environment is assigned both a row and column number.

each cell as a row and column number
If the table has merged cells, the numbering does not change. The invisible cells are given their number, and the non-invisible cells keep theirs.
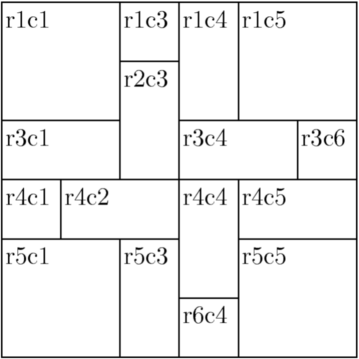
each cell as a row and column number
customization options
Here is a table of possible properties you can use to customize each cell.
| option | result | note |
| width=<dimen> | set height | |
| height=<dimen> | set height | |
| background=color | sets color | used in conjuction with color=<color>;use the word "color," not the name of the color |
| color=<color> | sets color | used in conjuction with backgroundcolor=color |
| frame=<off>|<on> | turns frame (borders) off or on | |
| framecolor=<color> | set color of border | |
| rulethickness=<dimen> | set thickness of rule for entire frame around cell |
Changing cells by their numbers
To change something for individual cells using cell addressing (that is, identifying the cells by their rows and numbers), use the [:setupTABLE] command, followed by the number of the column, followed by the number followed by the number of the row, and finally followed by the desired customization. The following table makes the first cell (1, 1) and the middle cell (2, 2) red.
%needed to get color
\setupcolors[state=start]
%
% set up first column, first row
\setupTABLE[1][1][background=color, backgroundcolor=red]
%
% setup second column, second row
\setupTABLE[2][2][background=color, backgroundcolor=red]
Changing rows
To change the appearance of one or more rows, use “r” as the property for your first option. In the second option, describe which rows you want to change. Use each for every row; odd for odd rows; even for even rows; first for the first row; last for the last row; a number to indicate a certain row; a series of numbers separated by commas to indicate a series of rows.
% change color of all even rows to red
\setupTABLE[r][even][background=color, backgroundcolor=red]